⚠️ Part 1: Before Your First Trip: Towing & Safety
ℹ️ Affiliate Disclosure: Some links on this page are affiliate links. As an Amazon Associate, we earn from qualifying purchases at no extra cost to you. We only recommend gear we trust.
Towing a travel trailer for the first time can be intimidating, but safety on the road comes down to a predictable routine. Before you pull out of your driveway for that maiden voyage, take the time to master three critical areas: proper hitching, managing your weight distribution, and practicing smart towing habits.
The Hitching Routine (Step-by-Step)
Never rely on memory when hitching up. Create a strict physical routine and walk through it every single time, without distractions.
- Drop and Lock: Lower the trailer coupler onto the hitch ball until it seats completely, flip the latch down, and secure it with a safety pin or lock. Pro tip: Jack the trailer up slightly after latching to ensure it’s truly locked onto the ball and won’t pop off.
- Cross the Chains: Crisscross your safety chains under the trailer tongue to form a “cradle.” If the coupler ever fails, the tongue will drop into the crossed chains instead of digging into the highway.
- Connect the Breakaway Cable: Clip the emergency breakaway cable directly to a secure point on your tow vehicle’s hitch frame (never wrap it around the hitch ball or safety chains). If the trailer detaches, this cable pulls a pin to instantly lock the trailer brakes.
- Plug in the 7-Way: Insert the 7-way electrical cord firmly into your vehicle socket. Do a physical walk-around to confirm your running lights, brake lights, and turn signals are working perfectly.
Weight Distribution & Tongue Weight
Because Casitas are compact, how you load them matters immensely. Incorrect weight distribution is the number one cause of dangerous trailer sway.
- The 10-15% Rule: For safe towing, 10% to 15% of your total trailer weight must rest on the hitch ball (called tongue weight). For a typical loaded Casita weighing around 3,000 to 3,500 pounds, your tongue weight should be roughly 300 to 450 pounds.
- Too Light = Danger: Putting too much heavy gear (like coolers or heavy toolboxes) in the very back of the Casita lifts weight off the tongue, making the trailer highly unstable and prone to whipping back and forth at highway speeds.
- Too Heavy = Sag: Packing all your heavy gear at the very front puts excessive weight on your tow vehicle’s rear axle, causing the front of your vehicle to rise. This reduces your steering control and braking traction.
- The Golden Rule: Store your heaviest items directly over the trailer’s single axle or slightly forward of it. Secure everything so it can’t slide around during transit.
📺 Must-Watch: Shifting Weight Demonstration
This incredible scale model demonstration shows exactly what happens when weight is improperly distributed on a trailer. Watch how quickly the rig becomes unstable and loses control the second weight is added too far behind the axle. Keeping your gear properly balanced is your number one defense against dangerous trailer sway!
🚨 Emergency Action Plan: How to Stop Trailer Sway
If your Casita ever begins to sway or “fishtail” side-to-side at highway speeds, do not panic, do not slam on your vehicle brakes, and do not try to counter-steer. Overcorrecting or braking with your vehicle will violently amplify the sway. Instead, follow this immediate three-step checklist to snap the trailer back into line:
- Squeeze Your Manual Brake Controller: Reach down and slide the manual override lever on your dashboard brake controller. This applies only the trailer brakes, pulling your Casita backward like a taut string to instantly straighten the rig.
- Hold the Steering Wheel Straight: Keep your steering wheel completely straight and steady. Do not try to steer out of the sway or fight the side-to-side momentum.
- Lift Off the Accelerator: Gently take your foot off the gas pedal to let your vehicle naturally lose speed. Never stomp on your vehicle’s brake pedal or try to accelerate out of it.
Once the rig stabilizes, signal and slowly pull over to a safe area off the highway to check your cargo distribution, tongue weight, and tire pressures.
The Brake Controller: Don’t Leave Home Without It
Pulling a molded fiberglass trailer is only half the battle—stopping it safely is what keeps you out of trouble.
Every Casita over 13 feet is equipped with electric brakes, pushing your loaded trailer weight right into the 3,000+ lb territory. At this weight, a trailer brake controller isn’t just a smart recommendation; it is a legal and mechanical necessity in almost every state.
If you are towing with a mid-size SUV (like a Toyota 4Runner) or an older truck, your vehicle likely did not come from the factory with an integrated brake controller built into the dash. Without adding an aftermarket controller, stepping on your tow vehicle’s brakes means only your vehicle is doing the work to stop both rigs. This puts massive strain on your brakes and drastically increases your risk of trailer sway.
The “Plug-and-Play” Secret
Adding a brake controller sounds like a daunting wiring project, but for most modern tow vehicles, it is incredibly simple. Your vehicle likely has a factory wiring plug tucked up underneath the driver-side dashboard. To install a controller, you don’t cut any wires. You simply buy a cheap, vehicle-specific wiring harness adapter, plug one end into your vehicle’s factory port, and plug the other end directly into your controller.
Two Gold-Standard Options for Casita Owners
1. The Clean, Factory Look: REDARC Tow-Pro (Elite or Liberty)
The Problem It Solves: Traditional brake controllers are bulky boxes that screw into your lower dash, right where your knees hit when getting in and out of the driver’s seat.
Why It Wins: The main control module hides completely out of sight behind your dashboard panels. The only part you actually see is a tiny, clean control knob that mounts flush into a blank factory switch plate on your dash. It looks completely stock.
How It Works: It is a proportional braking system, meaning it senses how hard you are stepping on your vehicle’s brakes and applies the exact same proportional braking power to the Casita.
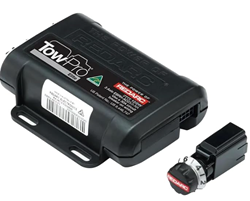
⭐ Road Ready Recommended: REDARC Tow-Pro
2. The Reliable Workhorse: Tekonsha Prodigy P3
The Problem It Solves: If you prefer a clear digital screen to monitor real-time braking voltage and want an interface that actively communicates diagnostic alerts, this is the industry standard.
Why It Wins: The Prodigy P3 has been trusted in the RV community for decades. It features an easy-to-read color display, distinct storage profiles if you tow more than one trailer, and a highly accessible manual override lever on the bottom of the unit in case you ever need to manually apply the trailer brakes to stop sway.
How It Works: Like the REDARC, it uses an internal sensor to deliver smooth, proportional braking that matches your vehicle’s deceleration.
Road Ready Tip: Before you hitch up for your first trip, take your rig to a vacant parking lot. Accelerate to about 20 mph and use the controller’s manual override to adjust the gain dial until you feel the trailer firmly braking without locking up its tires. You want to feel the trailer assisting the stop, not pushing your vehicle forward or dragging it to a violent halt.
A quick heads-up: I use the P3 myself, but factory supply issues have made it tough to find on Amazon lately. If it’s out of stock when you click through, check out the Tekonsha Primus IQ instead. It’s a fantastic, reliable backup option that uses the same smooth braking technology without the premium price tag.
🟢 Road Ready Tip: Before you hitch up for your first trip, take your rig to a vacant parking lot. Accelerate to about 20 mph and use the controller’s manual override to adjust the gain dial until you feel the trailer firmly braking without locking up its tires. You want to feel the trailer assisting the stop, not pushing your vehicle forward or dragging it to a violent halt.
Smart Towing Habits for Beginners
- Set Your Brake Controller: Before hitting the highway, pull into a safe, empty parking lot. Drive about 10 to 15 mph and manually squeeze your brake controller slider. Adjust the gain until you feel a firm braking assist from the trailer without the trailer tires locking up or skidding.
- Manage Your Speed: Trailer tires are typically rated for specific maximum speeds (often 65 or 75 mph). Keep your speed around 60 to 65 mph. It saves fuel, gives you plenty of stopping distance, and minimizes wind buffeting from passing semi-trucks.
- Check Your Mirrors: Adjust your mirrors so you can see down the entire length of the trailer and catch a glimpse of your trailer tires. If your tow vehicle isn’t wide enough, invest in a pair of clip-on towing extension mirrors.
The “Second Look” & Laser Thermometer Rule
After driving your first 20 to 30 miles on a trip, pull over in a safe parking lot or rest area to perform a quick walk-around. Grab an infrared digital laser thermometer and aim it directly at the center wheel hub or the metal immediately next to the hub on your axles.
The absolute temperature matters less than consistency, as normal hub temperatures can vary anywhere from 100°F to 150°F depending on the weather, terrain, and braking. As a general rule of thumb, if both of your hubs read within 15°F to 20°F of each other, you are usually in great shape. However, if one wheel reads significantly hotter than the opposite side, or if a hub shoots past 180°F, pull over safely. This is your ultimate early warning sign of low grease, bearing wear, or a dragging trailer brake before a catastrophic roadside failure happens.
🚐 Trailer Tire Pressure: The Golden Rules
Maintaining the correct tire pressure on your trailer is completely different from your everyday truck or SUV. It is your number one defense against dangerous blowouts, uneven tread wear, and trailer sway.
- Always Inflate to the Maximum Cold PSI: Look at the sidewall of your trailer tires (or the certification sticker on the front driver’s side of your trailer frame). Unlike cars, trailer tires are engineered to be run at their maximum inflation pressure when cold (usually 50 PSI or 65 PSI depending on the tire load rating). Never bleed air out of a hot tire.
- Why Max PSI Matters: Running a trailer tire under-inflated causes the sidewalls to flex excessively at highway speeds. This friction builds up extreme heat, which breaks down the rubber and causes a catastrophic blowout. Max PSI also stiffens the sidewall, which significantly reduces side-to-side trailer sway.
- Check Before Every Single Trip: Always check your tire pressures in the morning before you drive. Even a short mile down the road warms up the tires and gives an artificially high reading.
🛑 Common Towing Mistakes to Avoid
- Forgetting to double-check that the coupler latch is pinned and locked.
- Wrapping the emergency breakaway cable around the safety chains instead of the tow vehicle frame.
- Neglecting to adjust your brake controller gain before hitting the highway.
🏕️ Road Ready Tip
Slow is smooth. Smooth is fast. Almost every mistake made while towing or setting up a camper happens because someone is in a hurry. Take your time, follow your routine, and do not let an audience rush you.
📚 Next Guide
🤝 Help the Next Casita Owner
The best camping tips come from real Casita owners.
If you’ve discovered a better technique, noticed something we should improve, or have an idea that could make this guide even better, we’d love to hear from you.
Every suggestion is personally reviewed, and the best ideas help improve Road Ready Casita for future owners.
Ready to Test Your Knowledge?
You can continue reading the rest of our Guide Library to master your skills, or if you feel confident, skip ahead to take the official exam.